My Zamp panel is showing error code B01 or 601. What is that?
According to the Zamp website:
Zamp Solar Charge Controller Trouble Shooting and Error Codes (B01, 601)
Zamp Solar Charge Controller Fault Codes
Models: ZS-10AW, ZS-15AW, ZS-30A, ZS-30AD, ZS-60A
Fault Code Basics
-
- b01 – Battery Disconnected
- b02 – Battery Reverse Connection
- b03 – Battery Over Voltage (Input voltage to battery terminals exceeds 17.5-V)
- b04 – Battery Over Temperature (battery core is over 65°C, 149°F)
- p01 – Solar Panel Reverse Connection
- p02 – Solar Panel Over Voltage (greater than 26.5-V)
- 0Tp – Controller Over Temperature Protection (controller temperature while charging is greater than 65°C, 149°F)
b01 – Battery Disconnected
- This fault code appears when the Portable solar kit cannot detect a battery bank. Typical reasons for this can be:
- The portable kit is not attached to the battery bank. Attach portable kit to the RV battery bank with the alligator clips. If the RV is equipped with a Zamp Solar side wall port, plug in the portable kits SAE plug into the side wall port. The controller’s LCD display should no longer show a b01 fault code and instead, it will show a voltage reading.
- The RV’s battery bank voltage less than 10-VDC. This fault code also appears when the controller cannot recognize the RV’s battery bank if battery bank’s voltage has fallen below 10-VDC. If a voltmeter is not available, one method to verify the battery bank is good, is to check if the RV’s lights, fans or pumps function. If none of these devices work, the battery could be dead, or it is probably below 10-VDC. The battery bank will need to be fully charged using shore power or running a generator for at least 2 hours.
- The fuse in the portable kits wiring harness is missing or blown (uncommon), inspect and replace.
- If the RV’s has a solar side wall port, check for a missing or blown fuse, unattached solar port wiring at the battery bank. Inspect and correct the wiring, replace the fuse if required. The controller’s LCD display should no longer show a b01 fault code and instead it will show a voltage reading.
- Note: An alternate method is to check if the Zamp Solar portable solar kit is functioning correctly is to attach the kit directly to the vehicles “starter” battery using the alligator clips. The LCD display should no longer show a b01 fault code and instead it will show a voltage reading.
- If none of these steps correct the fault code, contact Zamp Solar Technical Support.
b02 – Battery Reverse Connection
- This fault code appears when controller battery wires have been either reversed at the controller or at the battery bank. Inspect both locations and correct the wiring, after correcting the wiring, the controller’s LCD display should no longer show a b02 fault code and instead it will show a voltage reading.
- If this step does not correct the fault code, contact Zamp Solar Technical Support for further assistance
b03 – Battery Over Voltage
- This fault code is uncommon when using a portable kit. However, this fault code could appear if the portable kit has an internal wiring issue. Note: This fault can also occur if the kit is connected to a 24-VDC battery bank system. Ensure the RV is using a 12-VDC battery bank. If the battery bank is indeed a 12-VDC system and the fault code remains, contact Zamp Solar Technical Support for further assistance.
b04 – Battery Over Temperature
- Zamp Solar portable kits do not come standard with a battery temperate sensor. This fault code is uncommon and can only occur if the portable kit’s controller is using the optional battery bank temperature sensor. Contact Zamp Solar Technical Support for further assistance.
p01 – Solar Panel Reversed Connection
- This fault code is uncommon but could appear if the portable kit’s controller wiring has been reversed. Contact Zamp Solar Technical Support for further assistance.
p02 – Solar Panel Over Voltage (greater than 26.5 volts)
- This fault code is uncommon but could appear if the portable kit has an internal wiring issue. Contact Zamp Solar Technical Support for further assistance.
oTp – Controller Over Temperature Protection
- This fault code is uncommon but could appear if the controller’s internal temperature while charging is greater than 149°F, (65°C). One example is if the portable kit is in direct contact with an external heat source such as generator exhaust. After cooling the controller for approximately 2 hours, the LCD display should no longer show an oTp fault code. Contact Zamp Solar Technical Support for further assistance if the fault code remains.
Models: ZS-8AW
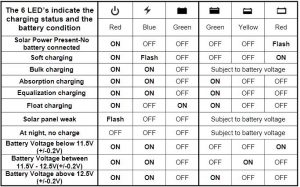
Solar Power Present-No battery connected
- Red Fault LED is ON
- Blue Charge LED has slow flash
- Green Full LED has slow flash
- This fault code appears when the Portable solar kit cannot detect a battery bank. Typical reasons for this can be:
- The portable kit is not attached to the battery bank. Attach portable kit to the
- RV battery bank with the alligator clips. If the RV is equipped with a Zamp Solar side wall port, plug in the portable kits SAE plug into the side wall port. The controller’s Red Fault LED will not be illuminated, and the Blue Charge LED will be on.
- The RV’s battery bank voltage less than 10-VDC. This fault code also appears when the controller cannot recognize the RV’s battery bank if battery bank’s voltage has fallen below 10-VDC. If a voltmeter is not available, one method to verify the battery bank is good, is to check if the RV’s lights, fans or pumps function. If none of these devices work, the battery could be dead, or it is probably below 10-VDC. The battery bank will need to be fully charged using shore power or running a generator for at least 2 hours.
- The fuse in the portable kits wiring harness is missing or blown (uncommon), inspect and replace.
- If the RV’s has a solar side wall port, check for a missing or blown fuse, unattached solar port wiring at the battery bank. Inspect and correct the wiring, replace the fuse if required. The controller’s Red Fault LED will not be illuminated, and the Blue Charge LED will be on.
- Note: An alternate method is to check if the Zamp Solar portable solar kit is functioning correctly is to attach the kit directly to the vehicles “starter” battery using the alligator clips. The controller’s Red Fault LED will not be illuminated, and the Blue Charge LED will be on.
- If none of these steps correct the fault code, contact Zamp Solar Technical Support.
Battery Is Reversed
- Red Fault LED is ON
- Blue Charge LED has a fast flash
- Green Full LED has a fast flash
- This fault code appears when controller battery wires have been either reversed at the controller or at the battery bank. Inspect both locations and correct the wiring, after correcting the wiring, the controller’s Red Fault LED will not be illuminated, and the Blue Charge LED will be on.
- If this step does not correct the fault code, contact Zamp Solar Technical Support for further assistance.
Solar Panel Reversed
- Red Fault LED is OFF
- Blue Charge LED is OFF
- Green Full LED is OFF
- Contact Zamp Solar Technical Support for further assistance.
Solar Panel Weak
- Red Fault LED has slow flash
- Blue Charge LED is OFF
- Green Full LED is OFF
- Contact Zamp Solar Technical Support for further assistance.
At Night – No Charging
- Red Fault LED is OFF
- Blue Charge LED is OFF
- Green Full LED is OFF
- Contact Zamp Solar Technical Support for further assistance
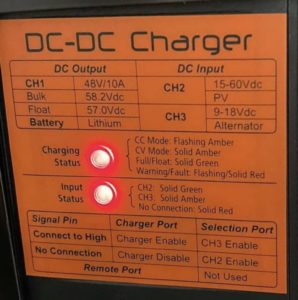
What do the red lights mean on the Kisae solar controller on my Volta (Pure 3) equipped Travato?

Group Member Joel Bean tells us this:
“Findings about Kisae controller. Although the manual discusses the status lights on the Kisae, you will only see two states.
ON and charging (solid green on bottom, flashing amber on top) and/or
OFF (both solid red).
Ignore the information about Constant Current, Constant Charge, and Constant Float. The Kisae does not control/monitor the state of the battery. Battery management for the Volta system does this and simply turns the Kisae on and off. Also, be advised that, although there is function in the Kisae to control charging from an alternator, these connection terminals are not used. This is also controlled by Volta battery management. I hope this addresses some confusion about the use of the Kisae controller. You will always see double red lights until the battery is below about 90%. One exception. If the Kisae starts charging the battery, it will continue until full. Once full, it will shut off, all red, and not resume unless the battery dips to below 90 or 91%, when Volta battery management turns it on again.”
Also note: The lights turn off completely at night (when there is no solar energy on the solar panels at all).
What do the lights on the Zamp control panel mean?
Does the House Battery Switch need to be on to charge the batteries?
For Travatos equipped w/AGM batteries (59G/59K)
For the purposes of this FAQ Generator Power is treated the same as Shore Power.
| Condition: | Disconnect State | Charge |
| Solar (w/sun) | Off or On | Yes |
| Driving | Off or On | Yes |
| Plugged in to Shore Power | Off | No |
| Plugged in to Shore Power | On | Yes |
(“Disconnect State” means whether the House Battery Switch is turned on or off.)
GL/KL: Pure3 is different. No charging occurs driving or solar unless the system is on. If you plug a Pure3 coach into shore power, the system will wake up automatically and start charging.
What is the Zamp solar port (on the side of Travato) for?
The Zamp solar input port on the passenger side of the Travato is used to connect a portable solar panel. Several panel sets are made by Zamp that can be used directly, and it is straightforward to adapt other panels to connect to this port.
Requirements for connecting here are:
- The wiring from this port is rated for 150W of solar panel(s)
- The portable panel should not have a regulator. The port is wired to the input side of the on-board Zamp controller, the same as the roof panel junction box.
IMPORTANT: Before connecting any equipment other than that made by Zamp, it is STRONGLY suggested that you contact Zamp Solar customer support to make sure that the wiring is compatible. If it isn’t they will suggest what changes you need to make.
Portable panels typically have legs to stand up at an angle so they can be aimed at the sun. If you’re camped where you can do so, re-angling the panels every few hours is worthwhile.

